Showing posts with label recipes. Show all posts

Sunday, May 24, 2015

Strawberry Season

It's strawberry season!  The first of the summer fruits to grace us each year is finally at its sweetest, juiciest, ripest peak.  I have been savoring these few precious, fleeting weeks by eating buckets of strawberries from a local strawberry patch and dreaming up countless ways to prepare them.

The first of my creations was for Mother's Day.  I set out to find a recipe for strawberry cake, but I was disappointed to find that most recipes called for strawberry flavoring, strawberry jello or some other variety of fake or frozen strawberries.  I decided to make Ina Garten's Strawberry Country Cake, which is basically a strawberry shortcake.  It is a dense (but not heavy) sour cream cake with a hint of lemon zest, fresh strawberries, and whipped cream.  It was incredibly easy to make and it tasted.....delicious!!  The cake and whipped cream are the perfect accompaniments to fresh strawberries to bring out their flavor and sweetness.  It makes a beautiful-looking cake as well.  Everyone at our Mother's Day gathering loved it!  I have to say, I've never made a recipe from Ina Garten that I didn't like.  She is the queen!

Photo credit to my Grandmother's iPhone

Next up was a strawberry rhubarb pie from Smitten Kitchen.  I had never tasted rhubarb before, but I kept hearing how great it paired with strawberries, and how well it balanced their sweetness and softness.  After making it and finally getting a taste, I have to agree.  The pie turned out just sweet enough, and the crust recipe was maybe the flakiest and tastiest pie crust I have ever made.  Like Ina, I've never made anything by Smitten Kitchen that I didn't like!


Enjoy the strawberries while they last! 

~Ashley

Monday, April 27, 2015

Bread Baking: No-Knead Multi-Grain Bread

This recipe comes from Sonja and Alex of A Couple Cooks, who adapted it from Zoe Francois's cookbook The New Artisan Bread in Five Minutes a Day.  It is a great find because not only is it delicious, it is incredibly easy to make and it's got some nutritional value.  I stopped buying store-bought bread a while back because of the long list of strange ingredients.  It's nice to be in control of what goes into my bread...at least then I know I won't be eating lots of added sugars, preservatives, and flavor enhancers.  Homemade also just tastes better...and it's not too bad to look at on my kitchen counter!
I started by soaking rolled oats, quinoa, and chia seeds in water.  The recipe calls for sunflower seeds instead of chia, but the sunflower seeds in my pantry mysteriously disappeared before I had the chance to use them.  
The dough consists of all purpose flour, whole wheat flour, rye flour, the grains, water, salt, and yeast.  Basically I just threw it all in the mixer bowl and let it go until the dough was just formed.  I was careful not to over-mix so the bread would be tender and fluffy.  It really is the easiest thing in the world..no kneading necessary.  It's a piece of cake!  Easy as pie!  Why are there no bread puns?!  
Here it is after rising for a couple hours.  At this point I covered the bowl in plastic wrap and stuck it in the fridge to be made the next morning.
Peeling it out of the bowl in the morning was quite the tactile experience.  This isn't the typical smooth bread dough...it formed lots of tiny air pockets which gave it an interesting stretchy-ness and a sponge-like appearance.
Doesn't it look like a sea sponge?!
I divided the dough in half and formed each loaf by tucking the ragged edges underneath to make a smooth ball.  Onto the corn-mealed baking sheet to rest for an hour.
It has risen!
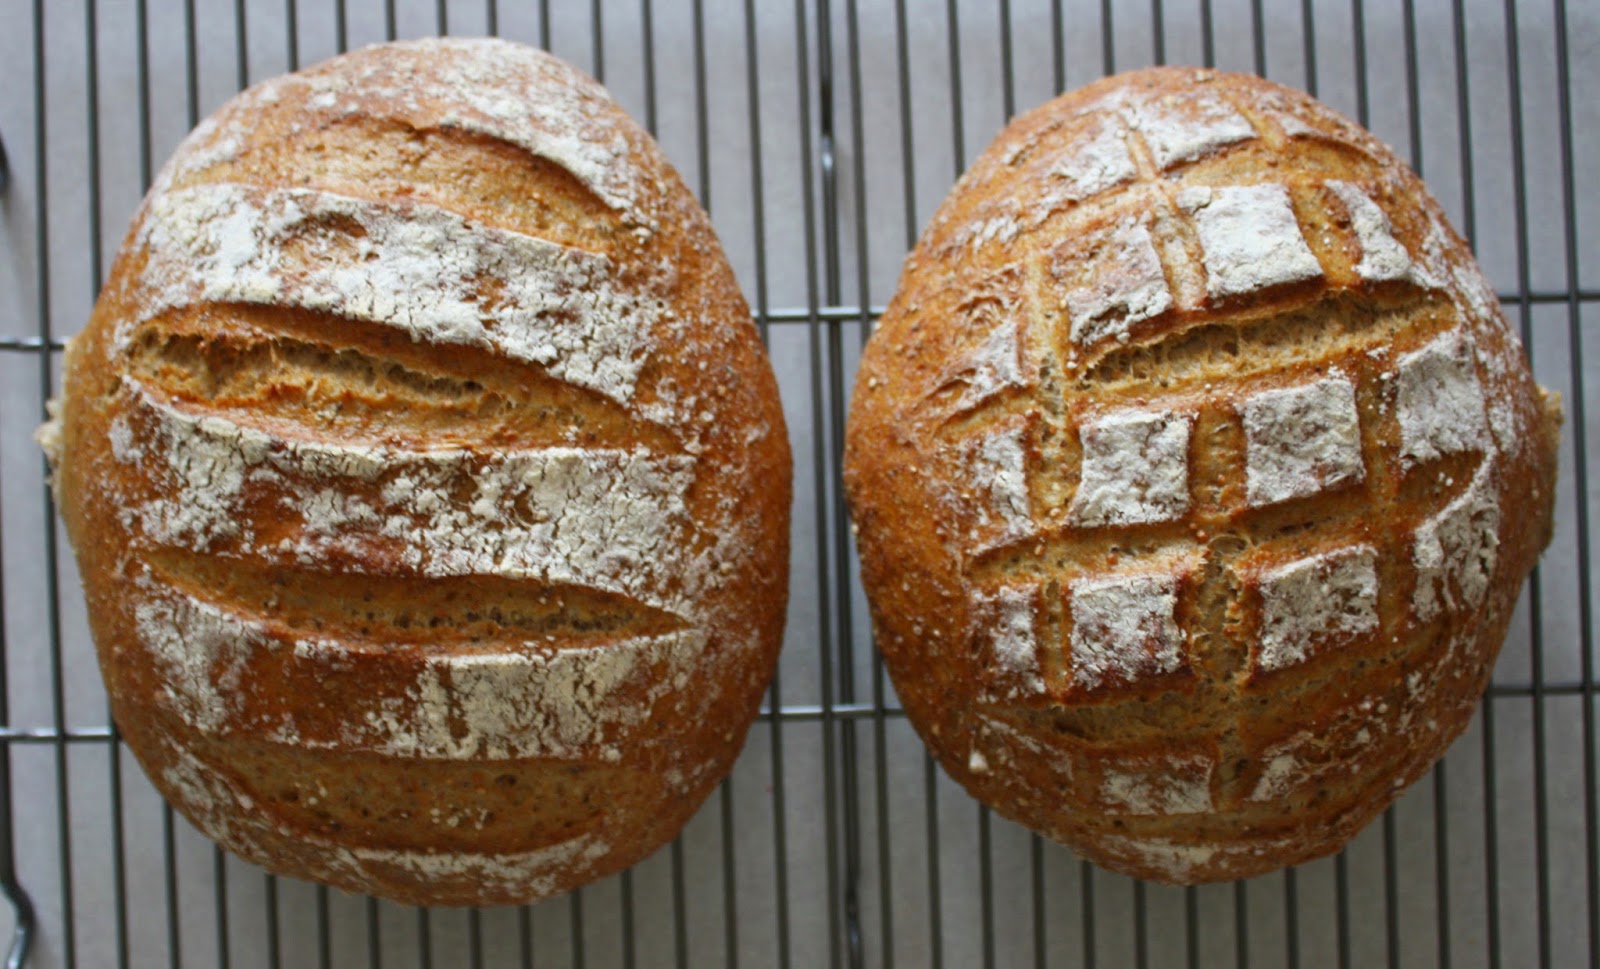
I floured the tops and cut some slashes with a serrated knife.  Quite artist-ique if I do say so myself.
All finished.  This is a hearty bread but it's not so hearty that it's tough or dense.  It's got a nice soft texture and a crunchy crust.  I eat it with my eggs in the morning, as a sandwich at lunch, and on the side at dinner.  I eat it all day!  It's that good.  Thanks A Couple Cooks!

~Ashley

Sunday, April 19, 2015

A Birthday Cake Experiment: 8 Layer Peanut Butter and Chocolate Cake

Last year for his 25th birthday I baked my brother this delicious chocolate and peanut butter cake from Smitten Kitchen.  It was quite well-received and touted "the best cake ever" (thanks Deb!) so when his 26th birthday rolled around last week I knew I had to deliver.  I didn't want to bake the same cake again, but I knew it would be hard to top last year's.  After some brainstorming I settled apprehensively on an 8-layer chocolate and peanut butter cake with chocolate ganache filling and peanut butter buttercream (if you haven't noticed, peanut butter and chocolate is the flavor du jour).  This is definitely the tallest and most complicated cake I have ever made, but taking it step by step made it not too hard, even for me.  Here's how it went down:


First things first I made the ganache recipe from this cake with Ghirardelli bittersweet chocolate.  I left it in the fridge to set up while I did the rest of my baking.


Next, I baked this recipe of chocolate cake which is actually the same recipe from the back of the Hershey's cocoa box.  It is a kind of odd recipe involving boiling water and a super-thin batter but the cake comes out beautifully moist (sorry if you hate that word) and rich-but-not-too-rich.  It's also not too sweet.  Perfect! 


I turned them out onto a rack to cool while I baked the peanut butter cake.


This peanut butter cake.  I found the recipe on The Daring Gourmet and boy am I glad I did.  It tastes like a giant peanut butter cookie!


Next step.  I used my Wilton cake leveler to trim the domed tops of the cake layers and slice the layers in half.  I must say it works really well, but only when the pre-determined height settings fit your needs.  When they didn't, I had to use a large bread knife.  No big deal though.  I began with a chocolate layer on a swiveling cake plate with strips of parchment tucked under the edges.  The ganache set up a bit too hard in the fridge to be spreadable so I portioned off enough for the layer in a bowl and microwaved it for 5 seconds.  This got it to a perfectly spreadable consistency so I used my small offset spatula to cover the layer in ganache.  


Up it goes!  This took awhile, not gonna lie.  I tried to get the layers as flat and as uniform as possible.  Experience has taught me that sloping and uneven cake layers just don't look as pretty.


And the cake is built!  Now bed time.


The next morning and the cake is ready to be iced.


There's my peanut butter buttercream looking a bit like cement but tasting delicious.  I used Wilton's recipe and I loved it!


This might've been the hardest part of making this cake - trying not to catch many crumbs in the icing and making sure it went on evenly.  


Ta da!  The icing had a light, whipped texture so the finished look was a bit...rustic, but I loved how it looked nonetheless!


Party time!  Here's the birthday boy and lovely Cindi with his cake.  (Excuse the candles...never buy sparklers from Target).


The first slice!


We did a number on it.


And we even got to take a few slices home!  

This birthday cake experiment was a success!


~Ashley


Friday, April 3, 2015

North Carolina Lemon Pie

One of the perks of being at home with my parents is getting to peruse their issues of Cook's Country magazine.  Often they highlight regional delicacies from around the country, but one in this year's March/April issue struck close to home.  It featured a lemon pie made famous in Atlantic Beach, NC and by chef Bill Smith at Crook's Corner restaurant in Chapel Hill, NC.  I must have been living under a rock during the four years I spent as a college student in Chapel Hill because I never once tasted or even heard of this pie.  Thankfully, one year after my graduation, I was finally enlightened by the perfection that is a saltine cracker crust, sour lemon custard, and vanilla whipped cream.  It is an incredible combination of salty, sour, and sweet that cements it in first place as my favorite pie ever.  No kidding!  It blows every lemon merengue pie I've ever had out of the water!
Saltine crackers don't seem like the obvious choice for a dessert, but they are perfectly balanced with the other flavors in this pie.  I don't think anything sweeter or sugarier would work.

6 ounces of crackers is about a sleeve and a half.

One tip for getting corn syrup (or any sticky liquid) out of a measuring cup: spray it with cooking oil first!


I'm in love with this pie plate I got for Christmas!

Slicing the butter first always helps it melt faster.

A food processor makes this crust super quick.  I used the same 1/4 cup I measured my corn syrup in to press the crust around the pie plate.

The sides of the crust shrank down when I baked it, but it leveled perfectly with the amount of lemon custard.  


I left a little of the lemon custard exposed when I topped it with whipped cream.


Delicious!

North Carolina Lemon Pie
Adapted from Cook's Country Magazine
For the crust:
6 oz. Saltine Crackers
10 Tbsp Unsalted Butter, melted
1/4 cup light corn syrup
1/8 tsp. salt
For the filling:
4 egg yolks
1 15 oz. can sweetened condensed milk
1 Tbsp lemon zest & 1/2 cup lemon juice (I used 2 lemons)
1/4 cup heavy cream
1/8 tsp salt
For the whipped cream
1/2 cup heavy whipping cream
2 tsp sugar
1/2 tsp vanilla extract

Pulse the crackers and salt in the food processor 15 times until they form coarse crumbs.  Add the melted butter and corn syrup, pulse 15 more times until the texture of oatmeal.  Dump into greased pie plate and use the back of a flat measuring cup or glass to spread around and up the edges evenly.  Bake at 350 fahrenheit for 16-18 minutes until golden brown.  
Whisk together egg yolks, sweetened condensed milk, zest, heavy cream, and salt until smooth.  Add lemon juice and whisk until smooth.  Pour into baked crust (doesn't need to be cool) and pop back in the oven for 15-18 minutes until set.  Let cool on a cooling rack, and then chill in the refrigerator for at least 4 hours (it's best if left overnight!).
Use beaters to whip the cream, sugar, and vanilla to stiff peaks.  Spread over the chilled pie and enjoy! 


~Ashley


Related Posts Plugin for WordPress, Blogger...